

Create Custom Post Types in WordPress without using Plugin

How to Create Custom Post Types in WordPress without using Plugin? Or How to Create Custom Post Types in WordPress? So, in this article, we will show you how to Create Custom Post Types in WordPress.
What Is Custom Post Type in WordPress CMS?
Custom post types allow you to go far posts and pages and create a different content type for your website or blog. Custom Post type transforms your WordPress website from a blogging platform into a powerful content management system (CMS) like WordPress.
You can purchase your hosting from Cloudsurph.com, Cloudsurph hosting is a reliable hosting option for business and personal projects. We offer insight and help on system configuration issues and code errors or bugs.
On your WordPress website, post types are used to help separate between different content types in WordPress blogs or websites. Posts and pages are both post types but are made to use different purposes.
WordPress comes from a few different post types by default, given below:
- Post
- Page
- Attachment
- Revision
- Nav Menu
So, you can also create your own post types, like custom post types. It is very useful when you create content that has an individual format than a default post or page.
IF you want then buy a good, reliable, secure web hosting service  from here: click here
For example, if you run a movie review website, then you would probably need to create a movie reviews custom post type.
So, you could also create custom post types for testimonials, portfolios, Notices, News, and products.
Why Do You Need to Create Custom Post Types?
Before you start creating custom post types on your WordPress website or any type of website that is made by WordPress, it is important to value your needs.
And, a lot of times you can get the same results with a normal post or page.
Now, we will show you the custom post type method, and also cover some ways you can display custom post types on your own WordPress website or Blogs.
Create Custom Post Types in WordPress without using Plugin
If you are working on your client’s site and don’t want to install any plugin, then you can manually create your own custom post type by adding the below code in your theme’s functions.php file.
SO, given below Custom Post Type code, you need to just place your theme function.php file, and no need for any task, just replace your post type name and save your file.
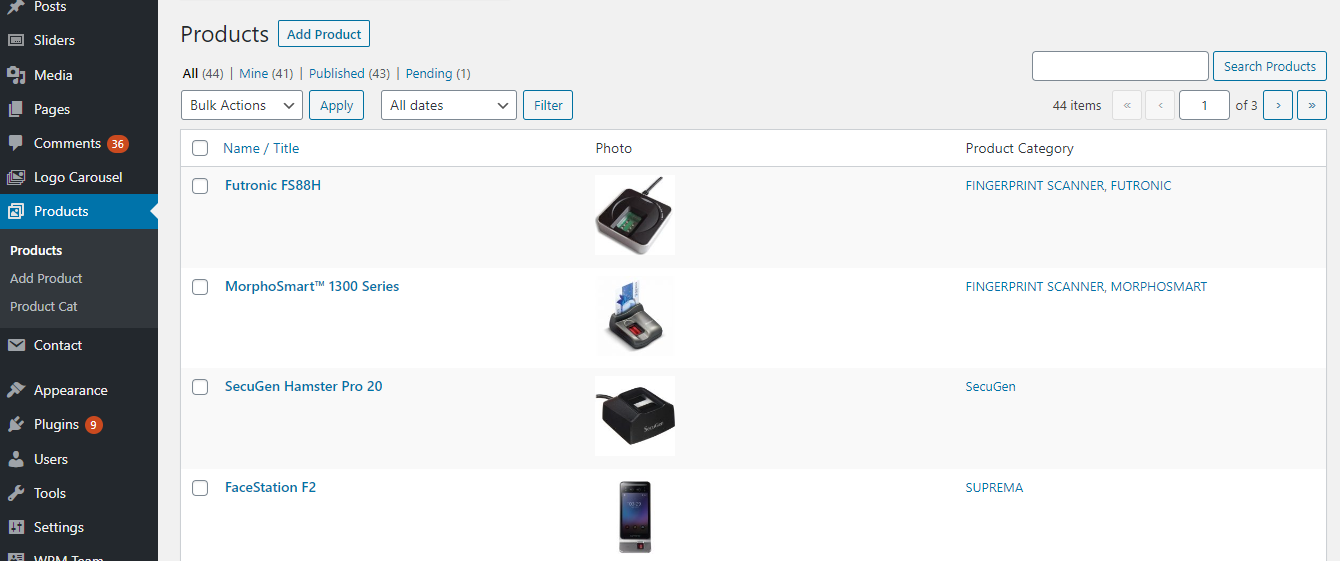
//PRODUCTS POST TYPE add_action('init', 'products_register'); function products_register() { $labels = array( 'name' => __('Products'), 'singular_name' => __('Product'), 'add_new' => __('Add Product'), 'add_new_item' => __('Product'), 'edit_item' => __('Edit Product'), 'new_item' => __('New Product'), 'view_item' => __('View Product'), 'search_items' => __('Search Products'), 'not_found' => __('Nothing found'), 'not_found_in_trash' => __('Nothing found in Trash'), 'parent_item' => __( 'Parent Product' ), 'parent_item_colon' => __( 'Parent Product:' ) ); $args = array( 'labels' => $labels, 'public' => true, 'show_ui' => true, 'capability_type' => 'post', 'hierarchical' => false, 'has_archive' => false, 'rewrite' => true, 'query_var' => true, 'menu_icon' => get_stylesheet_directory_uri() . '/images/icon-project.png', 'supports' => array('title', 'editor', 'thumbnail', 'revisions', 'page-attributes') ); // Initialize Category Labels $cproduct_cat = array( 'name' => _x( 'Product Cat', 'taxonomy general name' ), 'singular_name' => _x( 'Product Cat', 'taxonomy singular name' ), 'search_items' => __( 'Search Category' ), 'all_items' => __( 'All Category' ), 'parent_item' => __( 'Parent Category' ), 'parent_item_colon' => __( 'Parent Category:' ), 'edit_item' => __( 'Edit Category' ), 'update_item' => __( 'Update Category' ), 'add_new_item' => __( 'Add New Category' ), 'new_item_name' => __( 'New Category' ), ); register_taxonomy("cproducts-categories", array("product"), array( 'hierarchical' => true, 'show_ui' => true, 'has_archive' => true, "show_tagcloud" => false, 'labels' => $cproduct_cat, 'query_var' => true, "rewrite" => array( 'slug' => 'cproducts-cat', // This controls the base slug that will display before each term 'with_front' => false) ) ); register_post_type( 'product' , $args ); flush_rewrite_rules(); add_action( 'add_meta_boxes', 'product_meta_box_add' ); function product_meta_box_add() { add_meta_box( 'product_info_meta', 'Product Information', 'product_info_fnc', 'product', 'normal', 'high' ); } function product_info_fnc( $post ) { $custom = get_post_custom($post->ID); $ad_image = isset( $values['ad_image'] ) ? esc_attr( $values['ad_image'][0] ) : ""; wp_nonce_field( 'my_meta_box_nonce', 'meta_box_nonce' ); ?> <div class="inside" style="overflow:hidden;"> <div style="float:left; width:99%; margin-right:1%;"> <p><strong>Upload Your File Here</strong><br /> <script> jQuery(document).ready(function($){ var custom_uploader; $('#upload_image_button').click(function(e) { e.preventDefault(); //If the uploader object has already been created, reopen the dialog if (custom_uploader) { custom_uploader.open(); return; } //Extend the wp.media object custom_uploader = wp.media.frames.file_frame = wp.media({ title: 'Choose File', button: { text: 'Choose File' }, multiple: true }); //When a file is selected, grab the URL and set it as the text field's value custom_uploader.on('select', function() { console.log(custom_uploader.state().get('selection').toJSON()); attachment = custom_uploader.state().get('selection').first().toJSON(); $('#upload_image').val(attachment.url); }); //Open the uploader dialog custom_uploader.open(); }); }); </script> <label for="upload_image"> <input id="upload_image" type="text" size="36" name="ad_image" placeholder="https//" value="<?= @$custom["ad_image"][0] ?>" /> <input id="upload_image_button" class="button" type="button" value="Upload Doc. File" /> <br />Enter a URL or upload your file</label> </p> </div> </div> <?php } } // Save add_action( 'save_post', 'product_info_meta_save' ); function product_info_meta_save( $post_id ) { if( defined( 'DOING_AUTOSAVE' ) && DOING_AUTOSAVE ) return; if( !isset( $_POST['meta_box_nonce'] ) || !wp_verify_nonce( $_POST['meta_box_nonce'], 'my_meta_box_nonce' ) ) return; if( !current_user_can( 'edit_post' ) ) return; $allowed = array( 'a' => array( // on allow a tags 'href' => array() // and those anchors can only have href attribute ) ); // Make sure your data is set before trying to save it if( isset( $_POST['ad_image'] ) ) update_post_meta( $post_id, 'ad_image', wp_kses( $_POST['ad_image'], $allowed ) ); } add_filter("manage_edit-product_columns", "product_edit_columns"); function product_edit_columns($columns){ $columns = array( "cb" => "<input type=\"checkbox\" />", "title" => "Name / Title", "product-thumb" => "Photo", "cproducts-cats" => "Product Category", ); return $columns; } add_action("manage_posts_custom_column", "product_custom_columns"); function product_custom_columns($column){ global $post; switch ($column) { case "cproducts-cats": echo get_the_term_list($post->ID, 'cproducts-categories', '', ', ', ''); break; case "product-thumb": if ( has_post_thumbnail() ) : the_post_thumbnail(array(100, 80)); else : echo 'No Photo'; endif; break; } }
That’s it. If you enjoyed reading this article and have more questions please reach out to our support team via live chat or email and we would be glad to help you. we provide server hosting for all types of need and we can even get your server up and running with the service of your choice.