


Install WordPress on a VPS Manually In 4 Steps
Here is how to install WordPress on your VPS server in just four steps.
You will first have to buy a VPS server(Get $1 server today from Cloudsurph.com).
In this article, we will help you how to install WordPress on a server running CentOS 7.
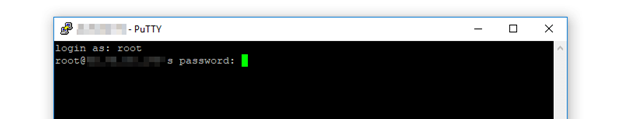
Connect to VPS Via SSH
After setting up the server, follow these instructions:
- Install Secure Shell (SSH) client such as Putty and then connect to the VPS server.

- In Putty, add your IP address and the port number to connect to the server. Now, enter your username and password and the server will get connected.
Install WordPress through SSH
You will first need to install the MariaDB database and Apache to run PHP on your server. The best part is that you can do it instantly.
sudosystemctl start httpd
sudosystemctl start mariadb
sudosystemctl enable httpd
sudosystemctl enable mariadb
Configure MariaDB as a WordPress Database
You will have to secure your MariaDB database so that people can’t access it remotely. So, enter the following command:
sudomysql_secure_installation
MariaDB will ask you for root user password. These will be blank by default. Simply hit enter key and then add a new password of your choice.
Hit Y for all of the remaining four options. The third one will disallow remote logins.
Login to your MariaDB account using the credentials you set earlier.
mysql -u root -p
Then you are inside the MariaDB database, run the following four commands.
CREATE DATABASE wordpress;
GRANT ALL PRIVILEGES on wordpress.* to ‘user’@’localhost’ identified by ‘password’;
FLUSH PRIVILEGES;
exit
You have successfully set up the database.
Run & Install WordPress
That you have MariaDB set up, install WordPress. Run the commands below separately to install WordPress on the VPS server.
wget http://wordpress.org/latest.tar.gz
tar -xzvf latest.tar.gz
sudocp -avrwordpress/* /var/www/html/
Let’s create an Uploads folder for WordPress installation. We will assign the correct permissions to files and folders through these two commands:
sudomkdir /var/www/html/wp-content/uploads
sudochown -R apache:apache /var/www/html/
sudochmod -R 755 /var/www/html/
Rename your WordPress wp-config-sample.phpfile to config file.
cd /var/www/html/
sudo mv wp-config-sample.phpwp-config.php
sudonanowp-config.php
The last command opens the file with nano editor. You can navigate the file with keyboard arrows. Simply replace:
define(‘DB_NAME’, ‘wordpress’);
define(‘DB_USER’, ‘user’);
define(‘DB_PASSWORD’, ‘password’);
Press CTRL+O to save the changes and CTRL+X to close the nano editor.
Now configure VPS server to allow HTTP and HTTPS connections. Use the following commands for this:
sudo firewall-cmd –permanent –zone=public –add-service=http
sudo firewall-cmd –permanent –zone=public –add-service=https
sudo firewall-cmd –reload