


First of all, let’s discuss what is a web server & How to install a web server:
How to install a web server? Web Server is a computer where the user stores data or content or any other type of information. The server hosts the content in the shape of a website and allows access to a single or multiple users. It has root access through FTP, SSH, or any other medium, and public access through the domain or IP address.
Examples include Gaming servers, Google Drive storage, Github pages, and this website.
Table of Contents
- Setting Up Your Server
- Creating a New User in Server
- Installing LAMP on Server
- Install Apache
- Install MySQL
- Install PHP Language Support
Functions of the Server
- Send the file to the client through URL.
- Generate response from the database by running a script

Likewise Source: Tutorials point
How Do You Create Your Server?
You can create your own PC as a computer. For this, you will need to install:
- CentOS or Debian on the PC
- It should remain online at all times
- You will need to add FTP and HTTP to make it a server
- Now add a domain to your server through the IP address you designate for it.
PS: First open the ports FTP 21 and HTTP 80.
In fact, the problem with this type of server is:
- It is too hectic to create a server at home
- The server will be slow because you won’t have the cache services available. Plus, bandwidth to your server will be limited depending on your internet connectivity.
- Your server has limited storage.
- You cannot keep the server online at all times due to electricity fluctuations and other technical issues.
The solution to this is to get a $1 VPS server. It is FAST, SCALABLE, and BUSINESS FRIENDLY.
Setting Up Your Server:
Similarly, you have a server. I will assume that the server is running CentOS. In any case, Debian or CentOS, you will need to manage it using Linux commands since there is nothing installed on the server yet. Also, there is no GUI interface available for the server.
So, connect to your server.
Furthermore ssh root@yourServersIP
Type ‘Yes’
![]()
It will ask for a password. You will have to type the password given to you with the server.
Add your password. Now, type your password again for verification.

As a result, You are now inside the server.
Creating a New User in Server
Moreover, you can create your first user and grant it admin privileges. Type the command:
Moreover adduser newUser
You can test if the new user is created by connecting to the server from another tab. In fact the same process applies. Type user IP and then type the following command on SSH.
ssh newUser@yourServerIP
Type your password to enter the server.

Installing LAMP on Server
Moreover, install the LAMP Stack.
The reason we need LAMP stack on the server is that it helps us build web and mobile applications. LAMP stands for Linux, Apache, MySQL or MariaDB, PHP.
Install Apache
To install Apache on the server. Type the following command:
Moreover sudo apt-get update
sudo apt-get install apache2

how to install a web server
You will see something like this. Type ‘Y’ to install Apache on the server.
Therefore, test it by entering your IP address in the new tab.
Here is how you can check your server IP address.
Further curl ipinfo.io/ip
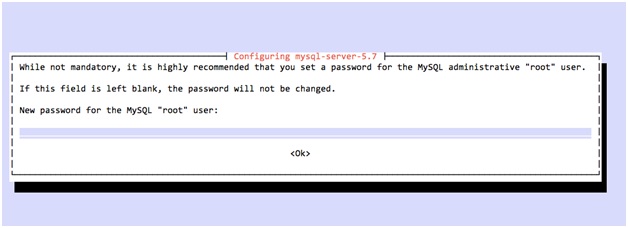
Install MySQL
Install MySQL on the server. Type:
Next sudo apt-get install mysql-server
It will prompt you with a (Y/N). Type ‘Y’ to install MySQL on the server.
The server will start to install packages. Once the packages are installed, Therefore it will ask you for root user’s password.
It will install other packages soon after. Wait for it to completely install. Once done, next create a new database directory.
Further sudo mysql_install_db
Install PHP Language Support
Now install PHP on the server so that you can run the apps of your choice.
Moreover sudo apt-get install php5 libapache2-mod-php5 php5-mcrypt
Most Ubuntu servers have PHP installed by default. PS: As a result Make sure that you are installing the latest PHP version on your server.
Furthermore, you will need to edit a file so that the Apache server picks PHP files by default.
besides sudo nano /etc/apache2/mods-enabled/dir.conf
We are using the Nano editor to edit that file. The file name is dir.conf

We will replace index.html with index.php. This way Apache will run index.php files by default.
besides Add the following code to the file.
<IfModule mod_dir.c>
DirectoryIndex index.php index.html index.cgi index.pl index.xhtml index.htm
</IfModule>
Furthermore save the file.
Restart your server for changes to take place.
besides sudo service apache2 restart
Congrats! You have successfully set up your server.
If you find this process hectic, you can switch to a $1 Cloud Server.