


In this article, we will explain Getting Started with Laravel: Installation and Setup Guide. Getting started with Laravel, a popular PHP web application framework, involves several steps to install and set up your development environment.
Below we discuss step by step:
Install Prerequisites:
Firstly, you need to make sure you have the following prerequisites installed on your system:
PHP (>= 7.3.0)
Composer (a PHP package manager)
You can choose MySQL or any other database
Web server (Apache, Nginx, etc.)
Install Composer:
Here, Composer is essential for managing Laravel’s dependencies. You can download and install Composer globally on your system by following the instructions at https://getcomposer.org/download/.
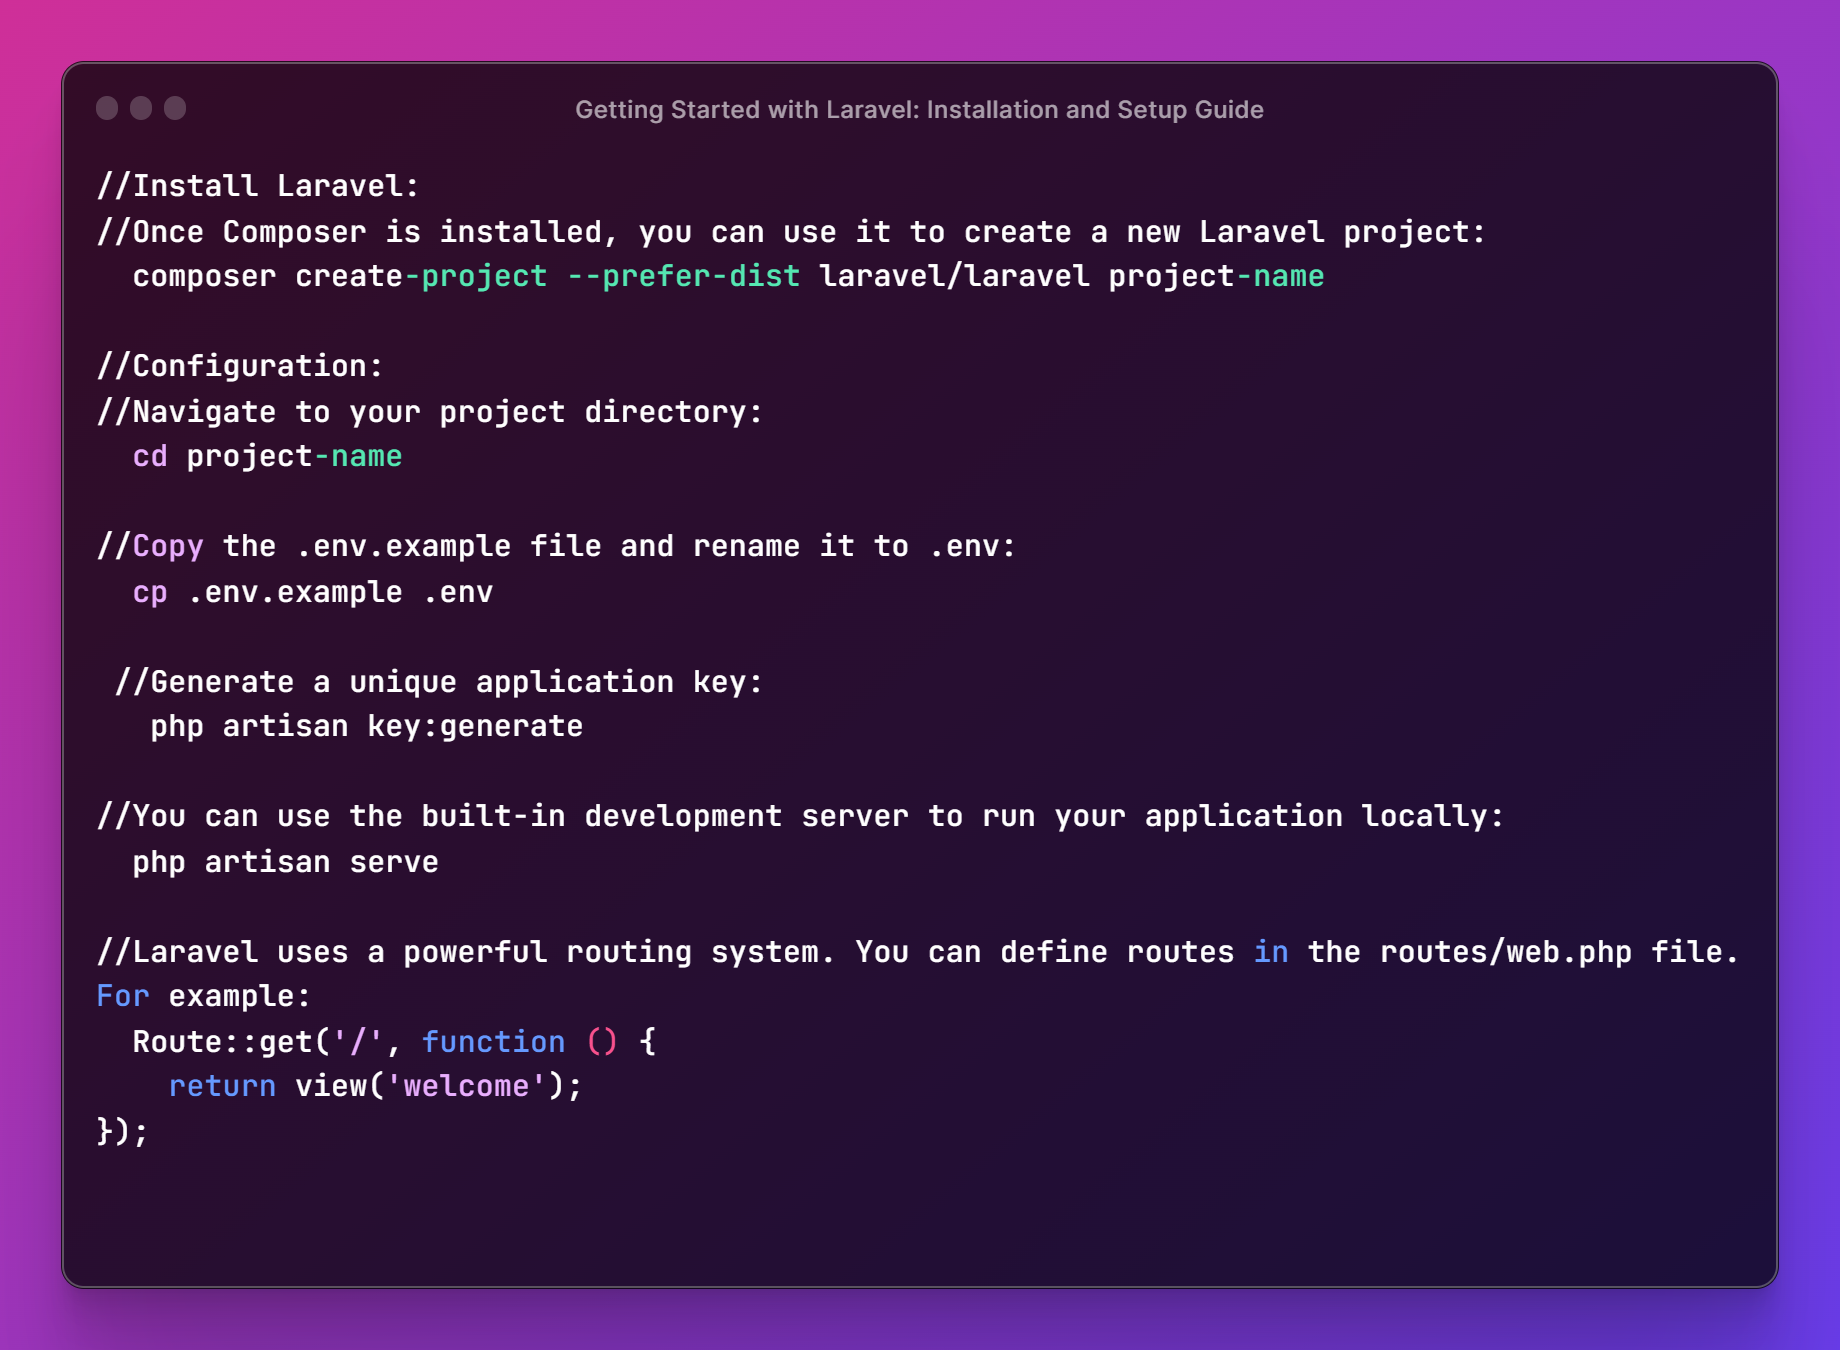
Install Laravel:
Now, if your Composer is installed, you can use it to create a new Laravel project like that:
composer create-project --prefer-dist laravel/laravel project-name
Hence, Replace project-name with the desired name of your Laravel project. This command will download and install Laravel along with its dependencies.
Configuration:
Navigate to your project directory:
cd project-name
Here, you can copy and rename the .env.example file to .env:
cp .env.example .env
SO, you can Edit the .env file to set up your database connection and other configuration options.
Here, we can Generate a unique application key:
php artisan key:generate
Serve Your Application:
Now, You can use the built-in development server to run your application locally:
php artisan serve
Now, This will start the development server, and you can access your Laravel application by visiting http://localhost:8000 in your web browser.
- Create a Heap in JavaScript
- Inserting Elements into a Heap in JavaScript
- Removing Elements from the Heap in JavaScript
- JavaScript How to Calculate Age from Birthdate
- How to interact JavaScript with REST API
- How to break ForEach in JavaScript
- Store Data in LocalStorage in JavaScript
Create Routes and Views:
Moreover, Laravel uses a powerful routing system. You can define routes in the routes/web.php file. For Instance:
Route::get('/', function () {
    return view('welcome');
});
Here, Create a corresponding view in the resources/views directory (e.g., welcome.blade.php).
Learn about Blade Templating:
However, Laravel uses Blade as its templating engine. It allows you to create dynamic and reusable views.
Learn more about Blade templating in the official documentation: https://laravel.com/docs/blade
Explore the Documentation:
So, The Laravel documentation is comprehensive and user-friendly.
It covers various aspects of the framework, from routing and views to databases and authentication.
Most Importantly, Visit the official documentation at https://laravel.com/docs to learn more.
Version Control:
Hence, Consider using a version control system (e.g., Git) to track changes to your project’s codebase.
Whatever, Hosting platforms like GitHub or GitLab can help you manage your project’s source code and collaborate with others.
Start Building:
At Lastly With your Laravel project set up, you can now start building your web application.
SO, Utilize Laravel’s features such as Eloquent ORM, Blade templates, authentication, and more to create robust and efficient applications.
Finally, Remember that Laravel’s strength lies in its documentation and community support.
in this paragraph, If you encounter any issues or have questions, the Laravel community is active and ready to assist on forums, social media, and developer communities.
If you want then buy a good, reliable, secure web hosting service from here: click here
In Conclusion, If you enjoyed reading this article and have more questions please reach out to our support team via live chat or email and we would be glad to help you. In Other Words, we provide server hosting for all types of need and we can even get your server up and running with the service of your choice.