

How to change an element's class with JavaScript

One of the most common tasks in web development is to manipulate the appearance and behavior of HTML elements using JavaScript. One way to do this is to change the element's class attribute, which can affect how the element is styled by CSS rules or how it is targeted by other JavaScript functions.
In this blog post, we will learn how to change an element's class with JavaScript in three different ways: using the className property, using the classList property, and using the setAttribute method.
If you want then buy a good, reliable, secure web hosting service  from here: click here
Previous JavaScript Articles
- JavaScript Variables
- JavaScript Operators
- Creating an Object in JavaScript
- Introduction to Asynchronous JavaScript
- Control Flow in JavaScript
- What is JavaScript Regex?
- JavaScript Events Example
- How to create a preloader in JavaScript?
- forEach method in JavaScript
- Sorting Arrays in JavaScript
- Linear Search in JavaScript
- Pagination in Vanilla JavaScript
- Transform Arrays with Map() Method
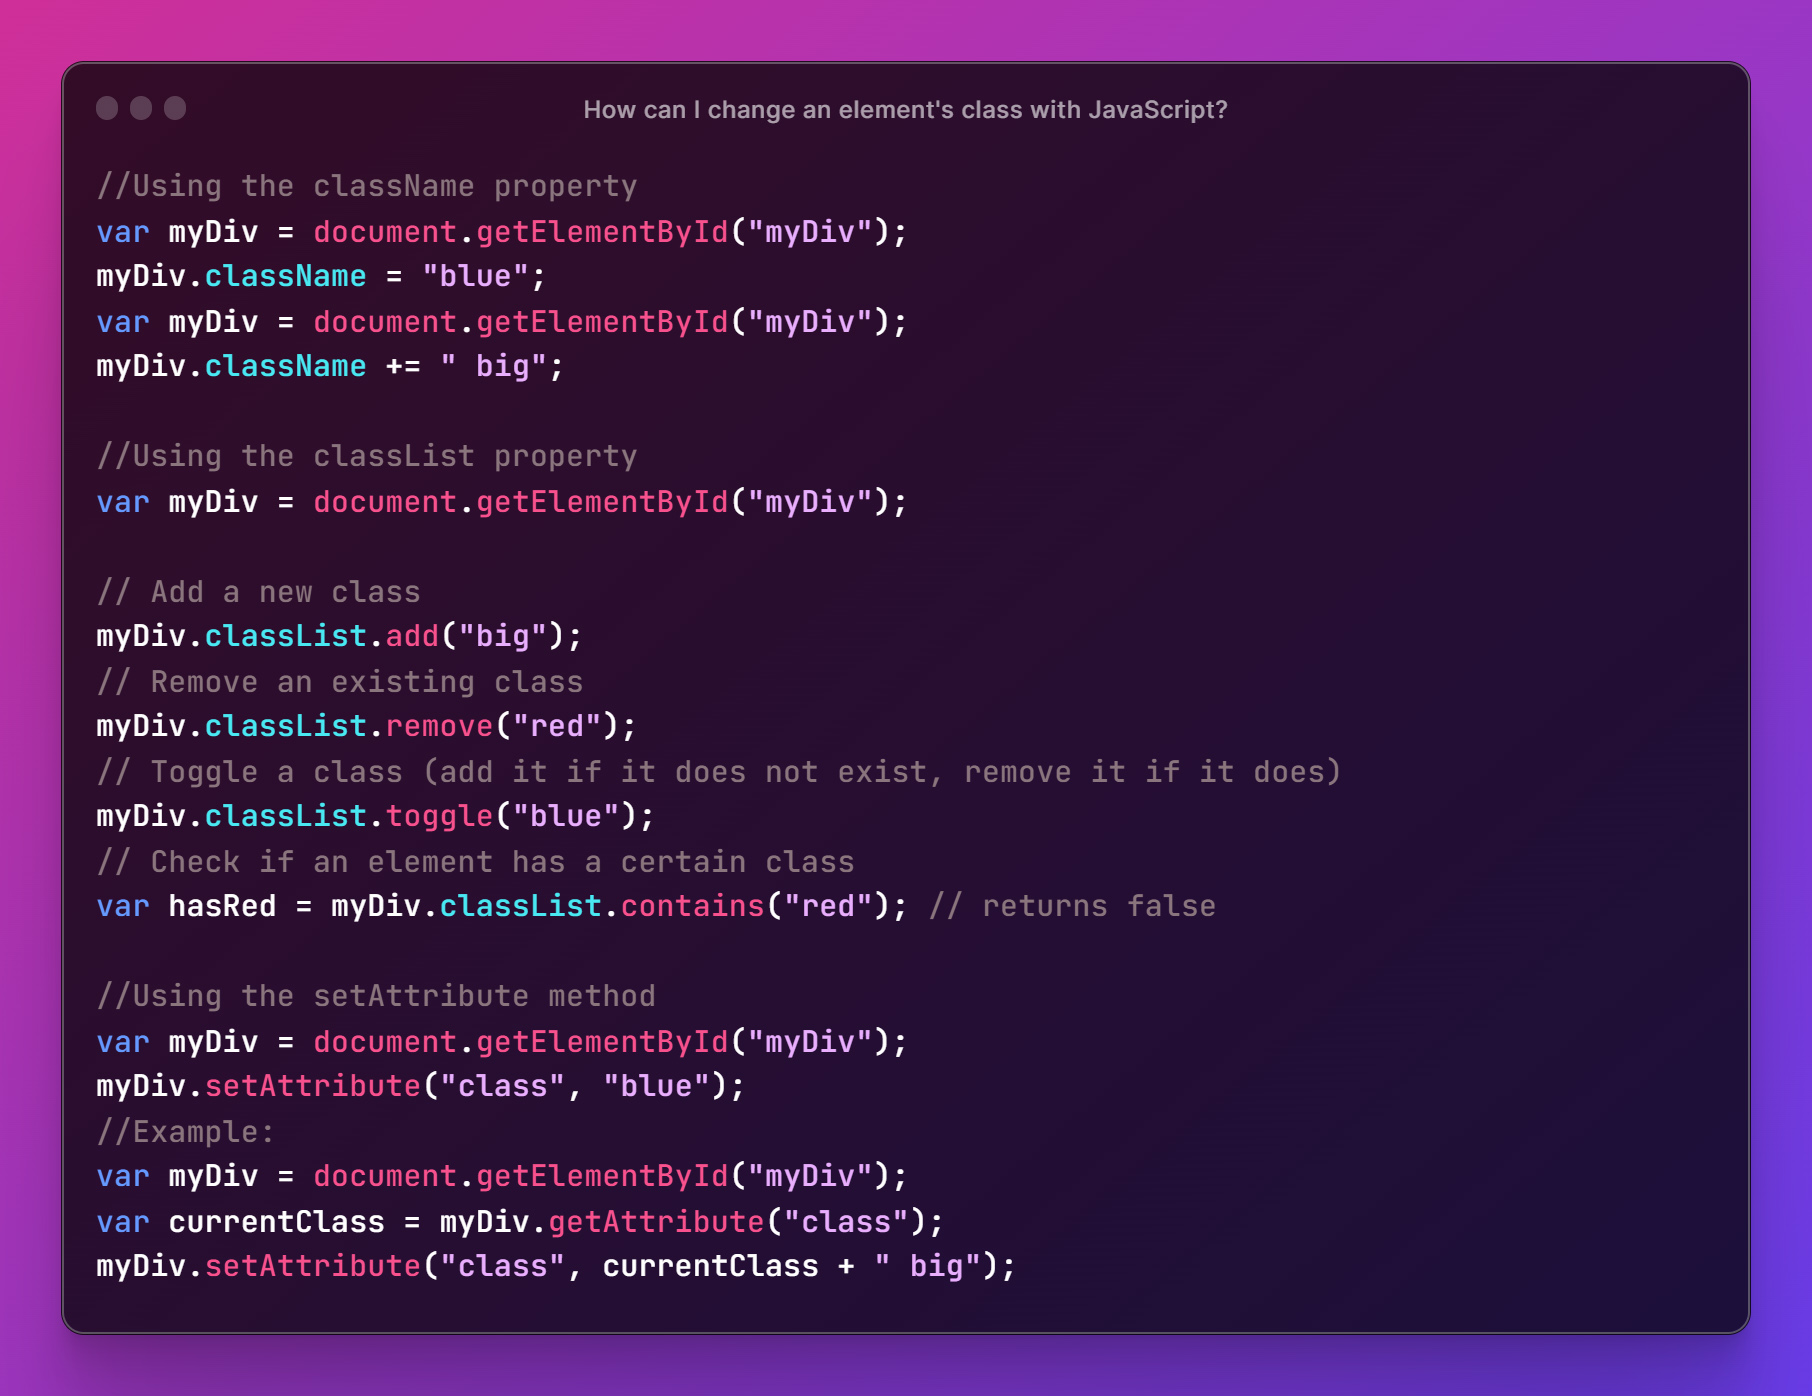
Using the className property
The simplest way to change an element's class with JavaScript is to use the className property, which returns or sets the value of the class attribute as a string. For example, if we have an element with id="myDiv" and class="red", we can change its class to "blue" by using this code: var myDiv = document.getElementById("myDiv");
myDiv.className = "blue";
This will replace the existing class value with the new one. If we want to add a new class without removing the existing one, we can use the += operator to append the new class to the existing value, separated by a space. For example:var myDiv = document.getElementById("myDiv"); myDiv.className += " big";
This will add the class "big" to the element, resulting in class="red big". Note that this method does not check for duplicate classes, so if we run this code again, it will add another "big" class to the element.
You can purchase your hosting from Cloudsurph.com, Cloudsurph hosting is a reliable hosting option for business and personal projects. We offer insight and help on system configuration issues and code errors or bugs.
Using the classList property
A more modern and convenient way to change an element's class with JavaScript is to use the classList property, which returns a DOMTokenList object that represents the list of classes of the element. The classList property has several methods that allow us to add, remove, toggle, or check for classes. For example, if we have an element with id="myDiv" and class="red", we can use these methods as follows: var myDiv = document.getElementById("myDiv");
// Add a new class
myDiv.classList.add("big");
// Remove an existing class
myDiv.classList.remove("red");
// Toggle a class (add it if it does not exist, remove it if it does)
myDiv.classList.toggle("blue");
// Check if an element has a specific class
var hasRed = myDiv.classList.contains("red"); // returns false
The classList property also has a length property that returns the number of classes of the element, and an item method that returns the class at a given index. For example:var myDiv = document.getElementById("myDiv"); // Get the number of classes var numClasses = myDiv.classList.length; // returns 2 // Get the first class var firstClass = myDiv.classList.item(0); // returns "big"
The classList property is supported by most modern browsers, but not by IE9 and older versions. If you need to support older browsers, you can use a polyfill or fallback to the className property.
Using the setAttribute method
Another way to change an element's class with JavaScript is to use the setAttribute method, which sets or updates the value of a specified attribute of an element. For example, if we have an element with id="myDiv" and class="red", we can change its class to "blue" by using this code: var myDiv = document.getElementById("myDiv");
myDiv.setAttribute("class", "blue");
This will replace the existing class value with the new one. If we want to add a new class without removing the existing one, we can use the getAttribute method to get the current value of the class attribute and then append the new class to it. For example:var myDiv = document.getElementById("myDiv"); var currentClass = myDiv.getAttribute("class"); myDiv.setAttribute("class", currentClass + " big");
This will add the class "big" to the element, resulting in class="red big". Note that this method does not check for duplicate classes, so if we run this code again, it will add another "big" class to the element.
The setAttribute method works with any attribute of an element, not just the class attribute. However, it is not recommended to use it for changing style attributes, as it may cause conflicts with CSS rules or inline styles. Instead, you should use the style property or CSSOM methods for manipulating styles.
Conclusion
In this blog post, we have learned how to change an element's class with JavaScript in three different ways: using the className property, using the classList property, and using the setAttribute method. Each method has its own advantages and disadvantages, so you should choose the one that suits your needs and browser compatibility requirements.
If you want then buy a good, reliable, secure web hosting service  from here: click here
That’s it. If you enjoyed reading this article and have more questions please reach out to our support team via live chat or email and we would be glad to help you. we provide server hosting for all types of need and we can even get your server up and running with the service of your choice.